Wednesday, 1 June 2011

Exhaust Heat Shield Second attempt!

You may remember me fitting a carbon exhaust heat shield back in May here

Well alas the heat of the exhaust was un gluing it from the bumper and I was lucky not to have lost in a million pieces on the motorway! A rethink was required and a new method of really, really, really sticking it to the car had to be looked at.

So I had a look at Wayside Adhesives website as I have found them to be suppliers of good quality items in the past. I settled on their Masterseal product.

It was only later that I saw there is an alternative to masterseal called masterbond, so I did the usual thing and shot myself in the foot (yet again).

Delivery was a bit slow taking a week, so adding a frustration bonus!

The main problem I had fitting the Goki Exhaust heat shield was it's warped nature. Carbon fibre is flexible I know, but as this was warped and twisted it presented me with a bit of a headache. Eventually with the use of a fair amount of duck tape I managed to strap the heat sheild to the back of the bumper and to stop fiddling I walked away!
The Master Seal does clean up with White Spirit, although I found that this would penetrate what you want to keep as well as removing what you don't want. So clean up was a pain. However you can get a very clean finish with the sealant and a steady hand. Naturally my lovely painted heat shield was looking very sorry for itself at the end of the attaching process and needed masking and painting 'on the car'.
The heat shield itself has two holes that you can use to locate with at the bottom either side of the aperture. Ideally these holes could be riveted to the bumper, however due to the warpage of the piece I just found that the rivets were under too much pressure and one ripped out of the side of the heat shield, so it was with a sigh I reached for the filler and just did away with them completely.


It sits there.. Laughing at me

Not fallen off yet!
Masking the Heat shield up was 'fun'. Ideally I would have used a scalpel to trim the tape, although typically that would require me to be organised and both my modelling knifes were 'missing in action' only to reappear after the job was complete. So I used a Stanley craft knife blade and patience to do the job. The master seal is overpaintable which is handy as it dries Matt black, it also goes a long way to covering up the fact that it isn't a perfect fit as you can see from the side views.

However I am being over critical as this is a part of the car that no one will really notice or look at!

Would I recommend you to try it? Um, no.. Well depends actually! Maybe, as it is possible to do, but it is a messy and frustrating job.

Super Forma Brake Stopper Fitted

 Fitting the brake stopper was simplicity itself and there are two rubber grommet's concealing a couple of bolt holes on the suspension strut. Ping these out, bolt in your break stopper and wind the thread of the 'stopper' part up to the brake cylinder.

Brake Stopper Fitted
Very easy installation with no scraping of knuckles! As to a review of it in use, well I can't honestly say that it makes a whole heap of difference to the braking, maybe, although this could be me actually thinking 'is it working?'

Brake stopper kit made using high quality components is a straight bolt on component for most skyline models. The Super Forma brake stopper is unique in design and function. Due to the high forces exerted against the bulkhead under braking, the Brake Stopper screws onto the suspension turret and is adjusted up to the end of the master cylinder and vastly reduces bulkhead flex. The kit includes all fixings and fittings required. Visit the Superforma website here

Alltorque's footage of Japfest 2011

A couple of 'young' film makers are covering all things petrol. Check them out on Facebook

Here is their footage of May's Japfest at Castle Coombe 2011 and especially enjoy the parade of Skylines at the beginning of the film cruising along the M4 in the morning sun.

Sunday, 15 May 2011

R34 Burns at Japfest 2011

Now this would ruin your day out!

From the driver. As posted on the GTROC forum. I have added some grammar, apologies if English is poor in some areas:

First (track) session breather pipe split by the turbo, changed the pipe but didn't have the time to clean all the oil off before next session

Second session, 2nd lap, slowed down and came in due to smoke in the foot well .
As it had started getting worse I stopped just by the ambulance and fire area at which point the aircon radiator exploded giving me a nose bleed. I got out walked round the front, went to walk back to get extinguisher behind my seat but was shouted at and pushed by the marshals to get back.

I was pretty dazed and shocked so I just had to stand back while it burned, as the fire truck guy was directing traffic to the pit lane

Totally my fault, next time to clean off the oil and waste a £35 session then loose the car... hopefully i'll bounce back stripped most of it last night interior is fine loom is done!! the main man mr Julian smith rang me this morning offering 1 can of Rio and 1 r34 gtr engine wiring loom

thanks to all that helped me get the car home i'm truly grateful


Alas, sooner or later this is the way of all things!

Tuesday, 10 May 2011

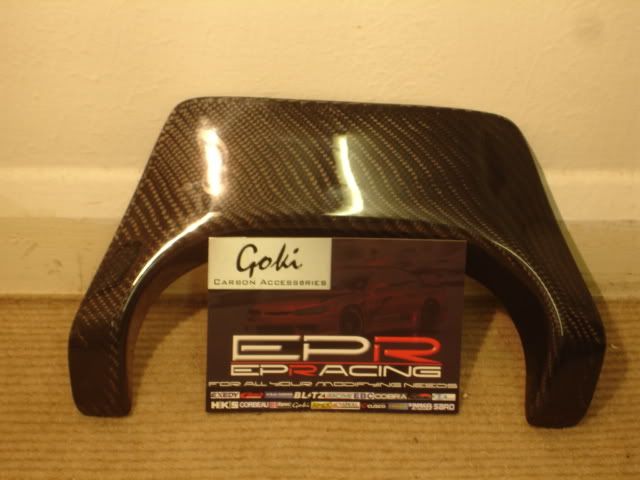
Goki Carbon Exhaust Heat Shield

Disaster! After the usual messing about with the catalytic converter for the MOT to keep the car legal on the roads in the UK swapping it out for with the de cat pipe. The exhaust moved a bit, enough to be just pressing up against the rear bumper causing some 'light melting' damage.

Not that anyone would ever notice I thought it would be an opportunity to have a play with a carbon heat shield.
The Carbon Version
I sourced the heat shield from EP Racing and it retails at a whopping £60. Although carbon parts are usually quite expensive. The irony being that personally I can't stand the sight of carbon and think it looks a bit cheap! The component itself was well made, if a little deformed.
Heated with hairdryer to get it to conform to bumper.
Fitting was reasonably straight forward, in fact I made this part of the process hard for myself as even though I knew it was deformed, I assumed (wrongly) that the sticky pads I had acquired would 'pull' it into shape.

I prepared the part by roughing up the lacquer finish slightly and using a thick filler primer to fill any pin holes. I then sprayed a coat or two of Nissan Kuro Black.

So I had the heat shield stuck firmly on the car and half hanging off at the same time! So after wrenching it free and picking off the sticky tape, I applied new tape and this time took a hair dryer to it, heating the carbon fibre up. I then pressed it into the rear bumper and it conformed to the curves like a dream! It would probably have been a much better idea to have done this before painting, but we live and learn!

See the underside of the car can get dirty
After some flatting back and polishing up the end result, although not spectacular. looks reasonably subtle and actually quite good. Hope you all agree dear readers!

Dyno Figures

Collected the car on May 3rd, which amongst other things was also my birthday! Although I suspect most would be less interested in that and more interested in the Dyno results of the tuning.


As you will see, these are hub figures so the read out is given at the wheels rather than the flywheel. For information (and bragging rights?) the conversion from the hubs to the flywheel is around 360 BHP.

Wednesday, 20 April 2011

R33 Brake Stopper

Due to the high forces exerted against the bulkhead under braking, the Brake Stopper bolts onto the suspension turret and is adjusted upto the end of the master cylinder. Thereby reducing bulkhead flex for a sharper more direct feeling that can be felt from the brake pedal.

Originally I was a bit unconvinced by fitting one of these and many of them usually come in a pressed metal bracket. However I have gone for a machined item (see pic). This was supplied from SuperForma and although they were slow on delivery (no stock) they generously refunded my postage. I strongly reccomend you try them if your interested in high quality items. The part is not particullarly cheap, although quality components will usually set you back more (you get what you pay for) with postage it would have set me back near enough £70 (79 Euro or $114 USD).

The component comes is a matt shot blast finish. I can tell you that from my days working in the casting industry that this is usually to hide machining marks! I took the 400 grade sand paper to it and it actually did polish up quite nicely! So all in all it is a good quality item.

Supa Forma Brake stopper for GTST

After a quick buff and polish
 As the car is currently waiting at the tuners (Abbey Motorsport) for it's all important mapping session, I will have to keep you all in suspense as to fitting and if it actually feels like it makes a difference!