Monday 27 June 2011

Modified Live! Brands Hatch 2011

Modified Live shows are held at regional race circuit venues taking place around the UK which are run to gather and celebrate all things Modified. Designed entirely to breath new life into the aftermarket modifying scenes and to give a welcome home to the guys and girls that share the same underlying passion to stand out and be different.

My Day started early (especially for a Sunday) at 5:30 AM. Happily I had gone to the effort of preparing all the usual crap to take with me (food, map and camera) the night before. So it was alarm, smoke, wash, shave and out the door and I was on the road by 6. Brands Hatch race circuit is a reasonably short jaunt around the M25 about 75 miles each way, I wasn't expecting to see a lot of traffic at that time on a Sunday and I was the third in our group to turn up.

It is quite a big show, although in some respects not all that impressive by the volume of people there, although perhaps I am being influenced by shows like 'Japbash' which are huge. Additionally although there was a very good mix of cars there, a lot of them were nothing to write home about. I did get to find out more about the wider car modding community though and wasn't aware of how many non make specific groups existed. Some of these groups are the strangest of tribes, young, tough men with shirts off and girl 'groupies'. Hair bleached to within an inch of it's life and fat wobbly thighs fighting to escape too tight hot pants.  Judging by some of the tattoo's I can't help but wonder what they will be like when they are older.


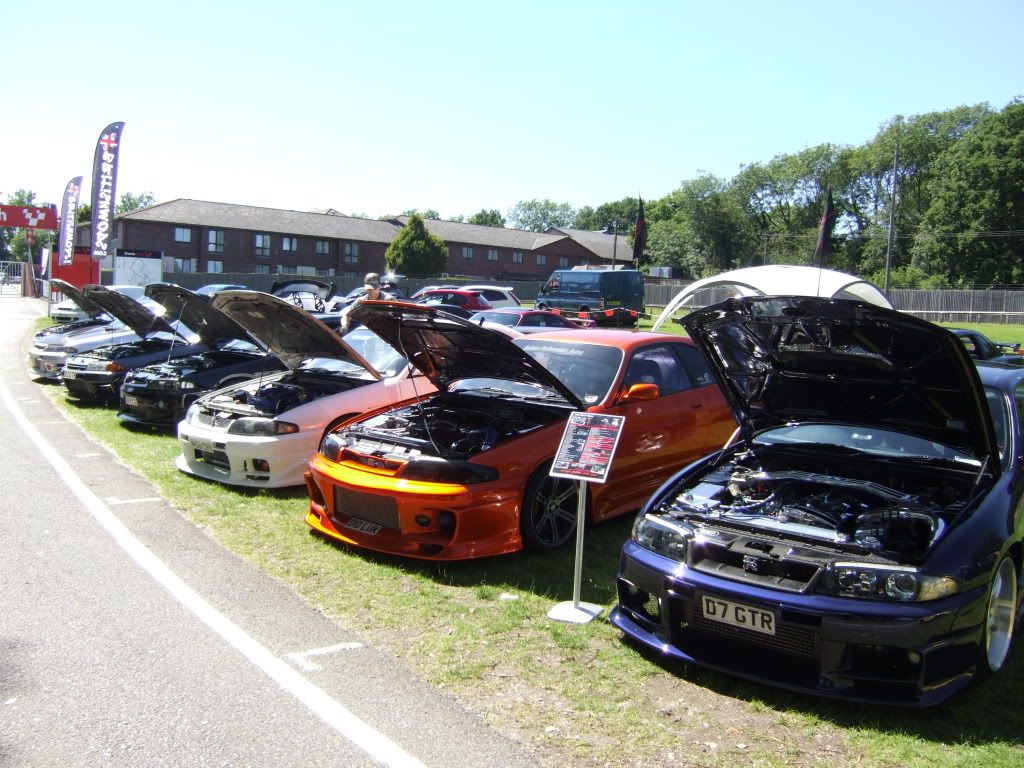
The Skyline Owners Club Stand did some swift business with the general public and the cars received a lot of attention, although we did have a very good area to display in and were not (as in most cases) shoved into a corner. We were parked up opposite a bank of trees (alas not offering us shade) these were shedding fluff like snow, which was catching on the breeze and generally blowing about. Of course the high polish of the cars attracted this stuff and we soon had a display of ever so slightly furry Skylines.

The weather remained sweltering hot and it was difficult in the afternoon to go for a walk without feeling like you were crossing the desert. Although a few emergency ice creams helped keep me going (the ones with a bit of chocolate flake in!). I drank plenty of pop and found that surprisingly things do stay lovely and cool in the boot of the car!

I did watch a bit of drifting, although the track action isn't all that exciting as no one actually races each other and it is all based 'on the clock'. Drifting although fun to watch can also become tiresome after you have seen ten minutes of it.

I did make a short film of the stand which you can find here.

And took a fair few photos and if you can stand it, these can be viewed here

Thursday 23 June 2011

Powder coater in the Berkshire area

Will be getting a couple of items powder coated shortly and plan to use these people. Will let you all know how they perform, although on the phone they certainly sound like my kind of people!

Thatcham Coatings
Unit 3/Pipers Ind Est/Pipers La,
Thatcham
RG19 4NA

Telephone: 01635 873055

Friday 17 June 2011

Been shopping GTST front doors

They say that you save money by picking up a bargain, even if you spend all the money you have getting it... Well I think on this one occasion I have managed a 'win!'

It's 23:00, been a long day and I made the day longer by running about for some spare parts.
These are the first of my exotic purchases. Two Skyline GTST front doors.
They are pretty straight, the electrics work, they have glass, unmarked door cards, handles, locks, keys for lock, wing mirrors and are generally 100% complete.

I also found out how bloody heavy a complete door is as I staggered into the kitchen with them!

R33 doors cheap!
What would you expect to pay for these little items? Well I have seen door glass alone going for £40 UK each.. So you do the maths.

I picked up BOTH doors for under £2.00 yes, really, in fact I felt a bit guilty about having them as it was legalised theft.
However, you will see that I did get some other interesting bits. Although these will have to wait as I could not fit them into my car and I had to stop off and store these at a friends house.

Skyline ownership need not cost the earth eh?

Thursday 9 June 2011

Cusco Front Strut Brace

Naturally I have had a strut brace to stiffen Ms Skyline on the bendy stuff for a while now. It's the first mod that anyone should do and works pretty good at stopping chassis flex.

However the one I have does annoy me a bit. For one it rubs against the top of the bonnet just enough for it to always looked marked and for two, the actual brackets were never very good.

I have managed to lay my hands on a Cusco brand of strut brace which I could not live without! I don't know if you can buy these new now, I certainly could not find any. The only options I have seen are cheapies on eBay (they look cheap too), Tein (okay but would need work) or some made from billet Aluminium at £300.

Anyway in way of a first post here's a picture of the turret tops, stripped and ready for painting.

Paint it any colour as long as its black

Front Splitter Pain!

After an argument with a ramp in which Ms Skyline came off second best, bottoming out and scraping the underside of the front splitter. I had two options, being, leave it, no one will look under her skirts or repair it.

The how hard can it be scenario?

So a bit of filler later and she was all in good shape again, although it did leave the problem of painting and as I am attending a car show this weekend, I did not have a lot of time to muck about. Initially I was just going to paint the underside and top of the right hand side, although extended that to the center and finally decided after much heart searching to do the whole front and the upper part of the right hand side!


At this point you think 'oh bugger'

As I'm getting experienced with crappy Acrylic paint now. I gave a quick blast of grey etch primer and a few coats of bright yellow filler primer to smooth out some of the deeper sanding marks. I then set about attacking with the Kuro Black spray, for which I used the HiCoat brand of aerosol spray cans.


Stay calm, stay calm!

These are a pretty good colour match and the pigments are not huge, although it is still difficult to get a smooth coverage 'first go'.


Another coat? or stooop!

The finished product does still need flattening down and there are some slight over spray areas that need attention, although I am letting the paint harden a bit more before getting physical with it. You do tend to find that the Acrylic finish dries a bit like plastic and can be 'peelable' when fresh!


Not perfect, but it will do til next time.
 Depending on how good I can get the ledge to the Intercooler (see below the number plate) I will decide if to spray it there or leave it.

Friday 3 June 2011

Reading Monthly Jap meet

Every third Tuesday of the month like minded individuals get together to pose with some of Japan's finest. From cheesey Civics to sorted NOS monsters there is usually something interesting to see. Ironically there are usually very few Skylines that show up and the owners are never very friendly (probably don't like the competition).
Anyway here are some photo's posted on Skyline Owners forum.

The night was enhanced with an appearance of 'blue Stig' who was mysterious and entertaining.

The only down side was that it managed to rain as I made my way back home, just enough to make Ms Skyline dirty!

Blue Stig
Garage D motor, note top mount intercooler oil cooler (only been incorrect  for a year LOL)
This guy managed to crash his car before arrival (in a rather embarrasing spot!)
Note the drift style raised bonnet (don't let the Police get you £30 fine!)
Mazda Rotary.. Shamefully I have forgotten which one (Was talking to the owner too!)
JDM Style!
Don't think I would fancy this behind my ears!
Bling wheel nuts do not a cool car make

Driver had to replace bonnet after last one blew up, apparently going to wrap it in carbon.

Pink!
Ms Skyline's engine bay

and again front on
Big thanks to Balloo2u who posted the pictures on Skyline Owners.

Wednesday 1 June 2011

New GTST badge

Long ago when I first got the car I had to consign the old boot badge to the bin. The original GTS-25T logo which as shipped is a transfer was well beyond saving.

At that point I was happy to go badgeless. I have seen others replace with stick on letters etc. Even (gasp) GT-R badges! Non of this was for me, nor the horrible GT-R style GT-S badges that seem so popular. However (for a change) Lady Luck glanced my way and when visiting Moff (moff shop) I chanced across a genuine Nissan aftermarket boot logo or as they say in Japan 'ornament'.

Moff showed me a neat trick for the removal of old badges. Rather than trying to pry off a badge by hand or risk your paintwork by levering it off. Simply get some nylon string and using it like you would floss your teeth, slip the string behind the logo and use a sawing action to remove it.

A short while later, with a bit of trimming of some sticky pads and my new logo is in place. Admittedly it does sit a little cramped with the GT-R spoiler in place. Although it passes the test of not looking crappy! hehe

To celebrate this I have included an excitingly angled picture.

Glamour shot!

Interior - fitting white replacement dials and chrome dial rings

When a Skyline is imported into the UK it comes with it's speedo set to KPH (kilometers per hour) which although okay is not a lot of good for a country used to the measurement of MPH (miles per hour). The usual way to get around this is by fitting a speedo converter, which by some electronic jiggery pokery changes the signal so that the speedo will read in MPH.
Of course this is all fine and good but does mean that you now have a KPH dial reading in MPH. Most people get around this by sticking a sticker over the top of the KPH reading MPH. The other way I have seen is that the K of KMPH is coloured in black.

None of the above display a very high level of refinement! So I cast about looking for a replacement dial, there are a few around.. Nismo ones (still in KMPH) rare and expensive, Plasma dials that light up as if its Christmas or my preferred choice Lockwood dials.

Lockwood dials have been producing replacement dials in the UK for many years. What appealed to me about them was that they were a direct replacement, featuring MPH plus the KMPH equivalent. Seeing as I had to change my clock after the auto to manual conversion it seemed like the ideal time to 'have a go' at this modification.

Fitting:
Very basically to replace the clock faces you have to remove the actual clock needles from the instruments, pull away the old black fascia and replace with the new one.

This sounds easier than it is... To remove the needles you first need to work out where they sit naturally, this involves gently pushing the needle round with your finger clockwise and anti clockwise until you meet resistance and marking that position in pencil on the dial.

After you have marked the resting positions of the needle you will need a hair dryer. Apply heat to the needle body where it is attached to the spigot, enough to make it reasonably hot (a good couple of minutes). Then with a firm twist and pull detach the needle. this works well on the majority of needles, but be warned that the rev counter is especially well attached and it would be a disaster to pull out the needle and spigot.

When all needles are removed you can then attach your new dials. Push your removed needles back into place and much like you would set the hands on a clock. Push them against resistance around to your pencil marks, you can then check both marks clockwise and anticlockwise.

I found that using my sat nav (which displays speed) the ideal way of checking calibration.

Chrome Dial Rings.
These are supposed to be a push fit. Some were and some were less so.. Suffice to say that if you can easily poke them out with your finger the application of glue maybe required. Originally I had a Skyline spec 1 front fascia to my instrument cluster. It always annoyed me and the first chance I had I obtained a Spec 2, which has a curved front face and warning lights are individually segmented. This is simply a painted Matt back plastic fitting and if yours is 'tired' you can use Wayside Adhesives plastic paint. This is specially formulated to give a 'plastic' look and feel. It is magical stuff!

Skyline R33 Dials

Finished item

The original dials and surround

Exhaust Heat Shield Second attempt!

You may remember me fitting a carbon exhaust heat shield back in May here

Well alas the heat of the exhaust was un gluing it from the bumper and I was lucky not to have lost in a million pieces on the motorway! A rethink was required and a new method of really, really, really sticking it to the car had to be looked at.

So I had a look at Wayside Adhesives website as I have found them to be suppliers of good quality items in the past. I settled on their Masterseal product.

It was only later that I saw there is an alternative to masterseal called masterbond, so I did the usual thing and shot myself in the foot (yet again).

Delivery was a bit slow taking a week, so adding a frustration bonus!

The main problem I had fitting the Goki Exhaust heat shield was it's warped nature. Carbon fibre is flexible I know, but as this was warped and twisted it presented me with a bit of a headache. Eventually with the use of a fair amount of duck tape I managed to strap the heat sheild to the back of the bumper and to stop fiddling I walked away!
The Master Seal does clean up with White Spirit, although I found that this would penetrate what you want to keep as well as removing what you don't want. So clean up was a pain. However you can get a very clean finish with the sealant and a steady hand. Naturally my lovely painted heat shield was looking very sorry for itself at the end of the attaching process and needed masking and painting 'on the car'.
The heat shield itself has two holes that you can use to locate with at the bottom either side of the aperture. Ideally these holes could be riveted to the bumper, however due to the warpage of the piece I just found that the rivets were under too much pressure and one ripped out of the side of the heat shield, so it was with a sigh I reached for the filler and just did away with them completely.


It sits there.. Laughing at me

Not fallen off yet!
Masking the Heat shield up was 'fun'. Ideally I would have used a scalpel to trim the tape, although typically that would require me to be organised and both my modelling knifes were 'missing in action' only to reappear after the job was complete. So I used a Stanley craft knife blade and patience to do the job. The master seal is overpaintable which is handy as it dries Matt black, it also goes a long way to covering up the fact that it isn't a perfect fit as you can see from the side views.

However I am being over critical as this is a part of the car that no one will really notice or look at!

Would I recommend you to try it? Um, no.. Well depends actually! Maybe, as it is possible to do, but it is a messy and frustrating job.

Super Forma Brake Stopper Fitted

 Fitting the brake stopper was simplicity itself and there are two rubber grommet's concealing a couple of bolt holes on the suspension strut. Ping these out, bolt in your break stopper and wind the thread of the 'stopper' part up to the brake cylinder.

Brake Stopper Fitted
Very easy installation with no scraping of knuckles! As to a review of it in use, well I can't honestly say that it makes a whole heap of difference to the braking, maybe, although this could be me actually thinking 'is it working?'

Brake stopper kit made using high quality components is a straight bolt on component for most skyline models. The Super Forma brake stopper is unique in design and function. Due to the high forces exerted against the bulkhead under braking, the Brake Stopper screws onto the suspension turret and is adjusted up to the end of the master cylinder and vastly reduces bulkhead flex. The kit includes all fixings and fittings required. Visit the Superforma website here

Alltorque's footage of Japfest 2011

A couple of 'young' film makers are covering all things petrol. Check them out on Facebook

Here is their footage of May's Japfest at Castle Coombe 2011 and especially enjoy the parade of Skylines at the beginning of the film cruising along the M4 in the morning sun.